How to hold a guitar pick: a beginner’s practical guide
Find a comfortable guitar-pick grip, check why it slips or catches, and use a short practice comparison to get clearer feedback from your teacher.
26 October 20266 min read
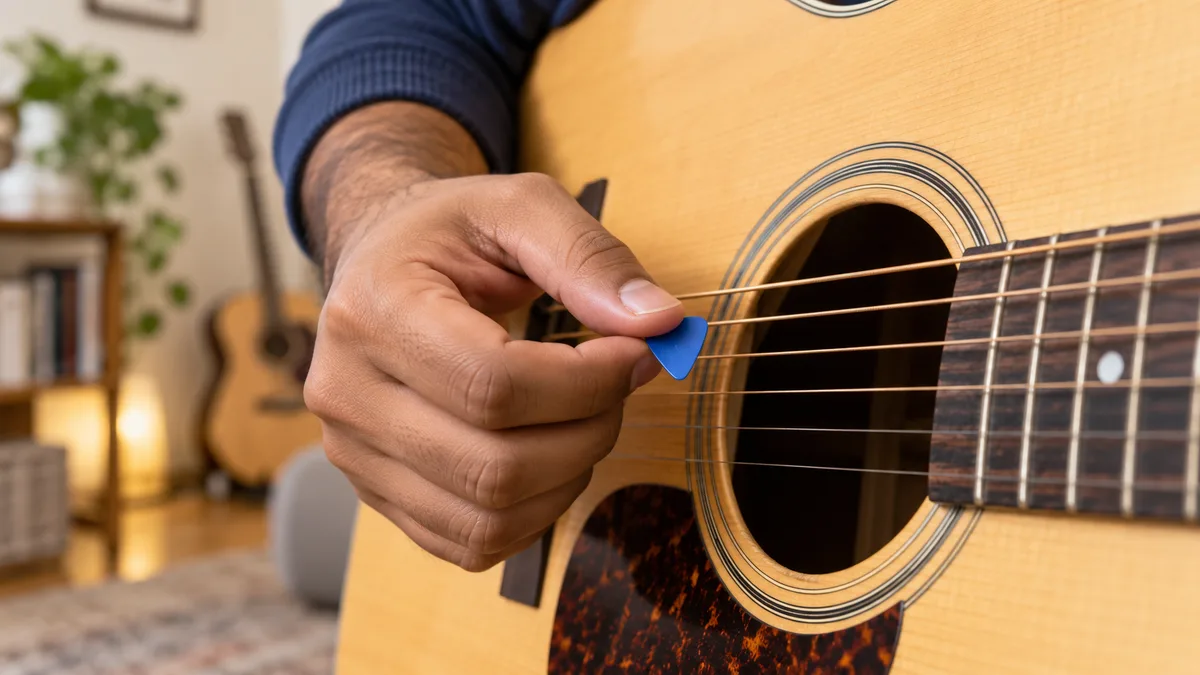
A pick that rotates halfway through a chord can make a simple song feel unpredictable. Before buying more equipment or practising faster, separate two tasks: holding the pick securely and moving it across the strings. This beginner guide gives you a starting grip and a short comparison exercise to bring to your next guitar lesson, whether you learn in Udaipur or online from another country.
Start with a relaxed thumb-and-index grip
Let your picking hand relax, then gently curl the index finger. Rest the broad part of the pick against the side of that finger and place your thumb over it. Leave the pointed end visible beyond the grip, facing the strings. Your thumb should support the pick rather than cover its playing edge. Fender’s beginner guide describes this thumb-and-index starting position and recommends a secure hold without excessive squeezing.
See Fender’s illustrated guide to holding a pick
Set the guitar comfortably before testing the grip. If you are also trying to prevent the instrument sliding off your lap, it is difficult to tell whether the picking hand is relaxed. Practise the movement on open strings first so the fretting hand does not add a chord-change problem. A left-handed player can use the same starting idea in the left picking hand.
How much of the tip should show?
Use enough exposed tip to reach a string without your fingers brushing it, then compare a slightly shorter or longer exposure. Fender notes that strumming and single-note work can call for different amounts of exposed pick. Treat this as an adjustment to explore, not a measurement you must reproduce exactly. Keep the pick you are using constant while you test the grip; changing several things at once makes the result hard to interpret.
Look at the pick before and after four slow strokes. Has it moved? Did the contact feel smooth, or did you have to force it through? Those two observations are more useful at this stage than a fast strumming pattern. Reset the grip between attempts instead of trying to rescue a slipping pick while continuing the song.
Choose a pick by comparison, not a promise
Rocksmith’s guide explains that thickness, surface texture and shape change how a pick feels, and describes more than one usable grip. A conventional flat pick is a straightforward starting point. If you already own two different picks, play the same slow passage with each and note which stays controllable. You do not need a collection before your first lesson.
Read Rocksmith’s guide to pick grip and design
A five-minute pick-control comparison
The following is an original suggested practice activity, not a speed target or a guaranteed improvement schedule. Stop between stages to reset your hand. Use a comfortable pace at which you can hear each stroke clearly, and skip chord changes until the contact feels predictable.
- Minute 1: hold the pick away from the guitar, release it and set it again several times. Notice where the thumb and index finger meet it.
- Minute 2: play four gentle downstrokes on one open string, pause and check whether the pick turned.
- Minute 3: alternate a downstroke and an upstroke on that same string. Keep the volume similar in both directions.
- Minute 4: try a light brush across several open strings. Change only the amount of exposed tip if it repeatedly catches.
- Minute 5: repeat the easiest version and write one observation, such as “the pick rotates after the upstroke”. Bring that observation to your teacher.
Apply a comfortable grip to beginner strumming patterns
When the pick slips or catches
If it slips, pause and rebuild the grip before adding pressure. Check that the broad part is actually supported between thumb and finger. Try a smaller movement and listen to the result. If it catches, compare a shallower contact with the strings rather than pushing the pick farther through them. Avoid turning every attempt into a louder strum: volume can hide the difference you are trying to notice.
Record a few strokes from the picking-hand side. Watch the first stroke and the last one: a gradual rotation is easier to discuss when you can show when it starts. If both directions feel different, test each separately before combining them. This observation-based approach helps your teacher suggest one change instead of asking you to rebuild your entire technique at once.
Show the picking hand during an online lesson
Use a camera angle that includes the soundhole or pickups, the wrist and the exposed pick. A face-only view will not show the contact with the strings. Test the framing before the call, then keep the device stable while you play. Demonstrate the troublesome stroke slowly and explain whether the issue is slipping, catching or uneven volume. A learner abroad can do this with the same guitar and pick used for everyday practice; specialised camera equipment is not necessary to start the conversation.
Prepare your setup for an online guitar lesson
Beginner questions about using a pick
Must every guitarist hold a pick identically? No. The thumb-and-index grip is a starting point to assess with your teacher, not a rule that erases all other approaches. Should you also practise with fingers? That depends on the music and technique you are learning; keep the two exercises separate so you know what you are evaluating. Should you keep playing when the grip feels uncomfortable? Pause, reset and ask your teacher to review the movement rather than trying to force it.
Get feedback on your own guitar
Bring your usual pick to a Jam Start 90 session and show the short exercise that feels difficult. Ask for feedback on the grip, camera angle and contact with the strings, then leave with one adjustment to practise. The useful outcome is a movement you understand well enough to repeat at home.
Want a clearer first step?
Meet a mentor, talk about what you want to play and get a learning plan built around your schedule.